Build Microservices with Ocelot API Gateway in ASP.NET Core
| Microservices - ASP.NET Core 3.1
Today we are going to learn about Microservice architecture and its implementation using Ocelot API Gateway in ASp.Net Core — 3.1. We all know the benefits of using Microservices for large-scale applications.
Microservice Architecture — Overview
There are two possible ways to build and structure the applications:
Monolith Architecture
Microservices Architecture
Monolith Architecture
Monolith is like a big container, wherein all the software components of an app are assembled and tightly coupled; i.e each component fully depends on the other. There are advantages and disadvantages to Monolith. Compared to Microservices the advantages are less in Monolith Architecture.

Disadvantages of Monolith:
Slow Development
If we modify any module or any component we need to redeploy the whole application instead of updating part of it. It consumes more time in slow development.
Unreliable
If one service goes down then the entire application stops working because all the services of the application are connected to each other.
Large and Complex Applications
For large-scale applications, it is difficult to maintain because they are dependent on each other.
It consumes more memory where each component will access the whole data and it makes more memory consumption and also rebuilds the application. In addition to that, we need to change the whole application and it makes the process a bit difficult.
Microservices Architecture
Microservices Architecture refers to a technique that gives modern developers a way to design highly scalable, flexible applications by decomposing the application into discrete services that implement specific business functions. These services, often referred to as “Loosely Coupled,” can be built, deployed, and scaled independently.
Setting up the Project
Create a Blank Solution

Create a New Solution Folder with the name Microservices
Right Click on Microservices Folder
Click on Add
Click on New Project
Create a Customer Microservice

Enter the project name
Choose API as a template and we are going with .Net Core 3.1 Version.
Click on Create
Create the Product Microservice
Follow the same process as we did for Customer Microservice.
Create the API Gateway
Choose Empty as a template with the same .Net Core 3.1 Version.
Folder Structure

Configuring the Ocelot API Gateway
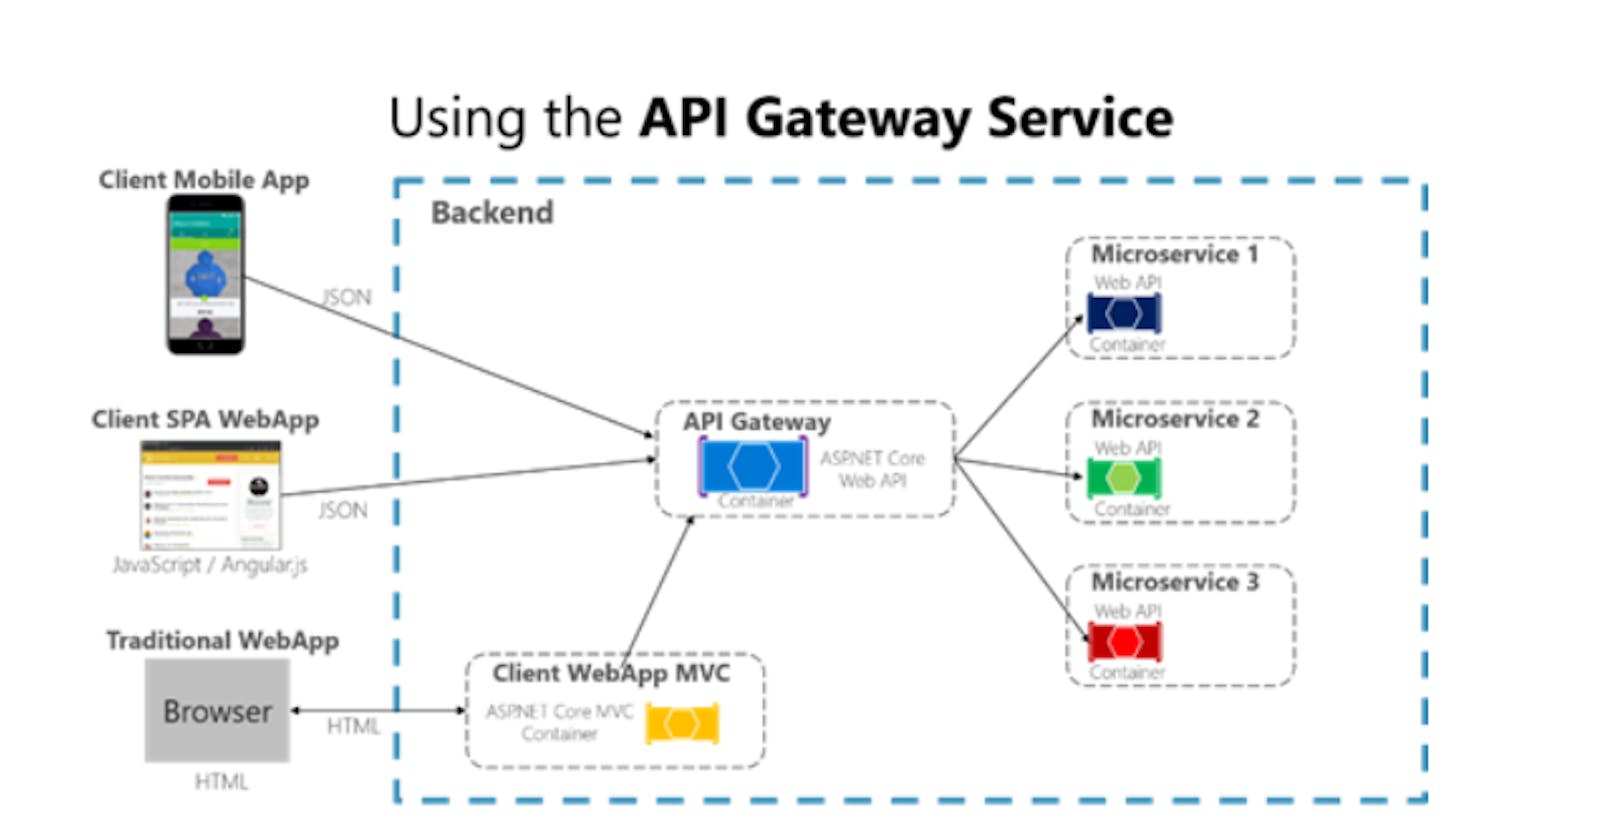
This is how the Ocelot API Gateway Works in our project.

To know about the Ocelot and its features go through this link Ocelot API Gateway
Install the package under the Gateway.WebAPI
Install-Package Ocelot
Add Configuration settings in Startup. cs
Startup.cs
using System;
using System.Collections.Generic;
using System.Linq;
using System.Threading.Tasks;
using Microsoft.AspNetCore.Builder;
using Microsoft.AspNetCore.Hosting;
using Microsoft.AspNetCore.Http;
using Microsoft.Extensions.DependencyInjection;
using Microsoft.Extensions.Hosting;
using Ocelot.DependencyInjection;
using Ocelot.Middleware;

namespace Gateway.WebApi
{
    public class Startup
    {
        // This method gets called by the runtime. Use this method to add services to the container.
        // For more information on how to configure your application, visit https://go.microsoft.com/fwlink/?LinkID=398940
public void ConfigureServices(IServiceCollection services)
{
    services.AddOcelot();
}

        // This method gets called by the runtime. Use this method to configure the HTTP request pipeline.
public async void Configure(IApplicationBuilder app, IWebHostEnvironment env)
{
    if (env.IsDevelopment())
    {
        app.UseDeveloperExceptionPage();
    }
    app.UseRouting();
    app.UseEndpoints(endpoints =>
    {
        endpoints.MapControllers();
    });
    await app.UseOcelot();
}
    }
}
Create configuration.Json File under the Gateway.WebAPI to define the Routes which are necessary for Microservices.
configuration.Json
{
  "Routes": [
    {
      "DownstreamPathTemplate": "/api/product",
      "DownstreamScheme": "https",
      "DownstreamHostAndPorts": [
        {
          "Host": "localhost",
          "Port": 44337
        }
      ],
      "UpstreamPathTemplate": "/gateway/product",
      "UpstreamHttpMethod": [ "POST", "PUT", "GET" ]
    },
    {
      "DownstreamPathTemplate": "/api/product/{id}",
      "DownstreamScheme": "https",
      "DownstreamHostAndPorts": [
        {
          "Host": "localhost",
          "Port": 44337
        }
      ],
      "UpstreamPathTemplate": "/gateway/product/{id}",
      "UpstreamHttpMethod": [ "GET", "DELETE" ]
    },
    {
      "DownstreamPathTemplate": "/api/customer",
      "DownstreamScheme": "https",
      "DownstreamHostAndPorts": [
        {
          "Host": "localhost",
          "Port": 44373
        }
      ],
      "UpstreamPathTemplate": "/gateway/customer",
      "UpstreamHttpMethod": [ "POST", "PUT", "GET" ]
    },
    {
      "DownstreamPathTemplate": "/api/customer/{id}",
      "DownstreamScheme": "https",
      "DownstreamHostAndPorts": [
        {
          "Host": "localhost",
          "Port": 44373
        }
      ],
      "UpstreamPathTemplate": "/gateway/customer/{id}",
      "UpstreamHttpMethod": [ "GET", "DELETE" ]
    }
  ],
  "GlobalConfiguration": {
    "BaseUrl": "http://localhost:44382"
  }

}
DownstreampathTemplate — Defines the route of the actual endpoint of Microservice
DownstreamScheme — scheme of Microservice, HTTPS
DownstreamHostsandPorts — Host and Port of Microservice will define here.
UpstreampathTemplate — The path at which the client will request the Ocelot API Gateway
UpstreamHttpmethod — The Supported HTTP Methods to the API Gateway. Based on the incoming method, Ocelot sends a similar HTTP method request to microservices as well.
Let’s test the application and this will run under the Gateway.WebAPI Port number which we already defined in the configuration.json file
launchsettings.json (Gateway API)
{
  "iisSettings": {
    "windowsAuthentication": false,
    "anonymousAuthentication": true,
    "iisExpress": {
      "applicationUrl": "http://localhost:51733",
      "sslPort": 44382
    }
  },
  "profiles": {
    "IIS Express": {
      "commandName": "IISExpress",
      "launchBrowser": true,
      "environmentVariables": {
        "ASPNETCORE_ENVIRONMENT": "Development"
      }
    },
    "Gateway.WebApi": {
      "commandName": "Project",
      "launchBrowser": true,
      "applicationUrl": "https://localhost:5001;http://localhost:5000",
      "environmentVariables": {
        "ASPNETCORE_ENVIRONMENT": "Development"
      }
    }
  }
}
Before testing the application make sure to run multiple projects in a single go.
Right Click on the solution
Click on properties

Run the Project to check the results.
Output
Product Microservice — endpoint

Customer Microservice — endpoint

Note
I also implemented Swagger in this to check the result of individual Microservices.
If you found this article helps you, please give it a 👍
Support me
Keep Learning!!!

